Create an Elegant Bracelet with Simple Wire Shapes
 |
| Craft this bracelets with simple shapes |
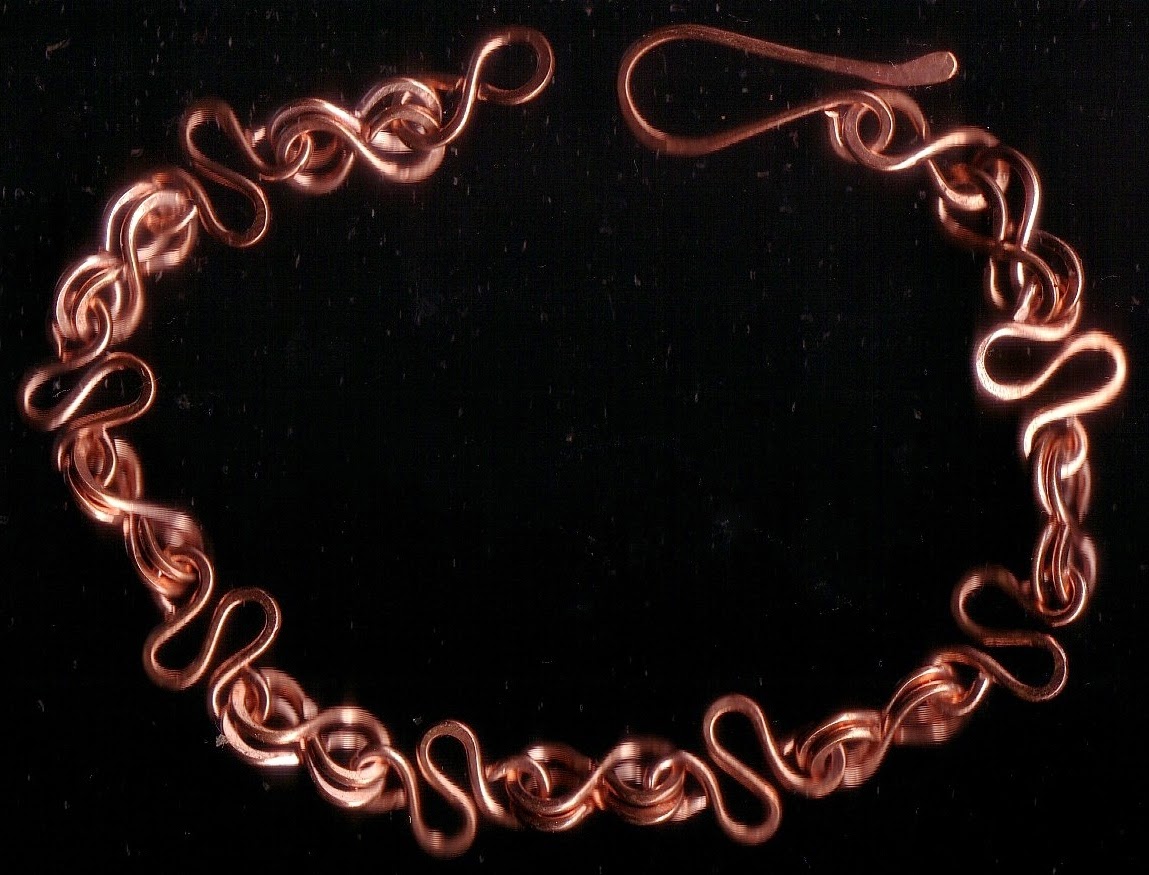
What if you're in a creative mood and want to craft something beautiful, but you don't have all day to do it. Try making a handcrafted bracelet with simple wire shapes.
 |
| Make a bracelet with swirl shapes |
The result can be a pair of earrings, a unique necklace or a simple, elegant bracelet like the one in the above photo.
Best of all, your handcrafted creations will look as though they took hours to make. Only you will know how quick and easy they were.
 |
| Illustration #2 Making Figure 8s and S shapes |

You can make your own bracelet with wire swirls, circles, triangles or whatever shapes you choose.
The common elements are the figure 8s that hold the wire shapes together. (Those wonderfully simple and elegant 8 shapes can perform multiple tasks.)
Here's what you'll need to get started.
Tools
- Pliers
- Needle nose pliers
- Wire cutters
- Hammer and block (optional)
- Files - If you don't have a set of metal files, try using cushioned emery files like those you find in a beauty supply store. They come in various grits from rough to smooth. They can be used for some of the smoothing and sanding tasks as a metal files.
- 16 gauge wire - I like 16 or even 18 gauge wire for a bold look. Thicker gauges also hold their shape better than thinner gauges.
- Practice with copper wire. Copper is less expensive and somewhat trendy. You can create wearable pieces with and develop your skills. When you're confident with your techniques, you can always switch to more expensive sterling or gold filled wire if you choose.
Create 18 figure 8s
To make your figure 8s follow the instructions in "3 Simple Wire-Working Jewelry Making Secrets..." For a bracelet that measures 7 and 1/2 inches, create approximately 18 figure 8s. If you want shorter figure 8s, cut your wire shorter than the instructions require. When using shorter 8s experiment to find the right number to use for your bracelet size.
Create 7 "S" shapes
- Cut 7 pieces of wire 2 & 1/4 inches each
- At a point approximately 3/4 from one end, use your round nose pliers to curve a section of wire. (see illustration #2)
- Starting from the other end, curve a section of wire in the opposite direction to complete your S shape.
- On both sides, the "tails" of your S should extend approximately 1/4 inch beyond the edge of the curve
- Using your round nosed pliers, make the "tails" into loops.
- To form your loop grasp each "tail" at the tip. Roll your pliers toward the curve on the other side.
- Use your pliers to close up the gaps for a tighter "S" shape.
- If you have a hammer and block or anvil, hammer your 8s and Ss. It will give them a slightly different look and make the shapes sturdier.
- Don't hammer your wire shapes too much. You'll weaken the metal.
 |
| Shepherd's Hook Clasp |
- Cut a 2 inch piece of 16 Gauge wire
- Use the thickest part of your round nose pliers to make a "u" shape with one side 1/4 inch longer than the other.
- Create a loop on the longest side.
- Bend a slight angle on the other side.
- Hammer the tip and the curve of your clasp. (Optional)
- File or smooth the rough edges.
Connect your shapes Into a bracelet
- Open an S and add two figure 8s. (Open it outward--like a door--so you don't destroy the loop.)
- Add another S.
- Continue the pattern until you have the length you desire.
- Add your shepherd's hook clasp to one end.
- Place a single figure 8 on the other end for a catch or use a jump ring if you prefer.
Triangle bracelet
 |
| Create a bracelet with triangular shapes |
This triangle bracelet was made with bolder 14 gauge wire.
In this version you don't have to make figure 8s to connect the pieces together. Here's how you do it.
 |
| Create triangles for simply elegant jewelry Use the flat edge of your pliers to form sharp angles |
Form your triangles.
- Roll the wire end into a loop.
- Hammer your triangles.
- Use your pliers to turn the loop perpendicular to your triangle.
- Connect your angles together at the loop.
- Use a figure 8 to add your hook to one end.
- Add another figure 8 to the other end for a catch.
More Shape-ly Ideas
 |
| Learn "Circular Style" techniques in my next post |
- Use your shapes to make earrings.
- Connect triangles, circles, or even squares together with figure 8s. Use them alone without anything else.
- Make necklaces with the same shapes and techniques.
Rewritten from my Featured Craft article previously published on Yahoo Contributor Network


Comments
Post a Comment